Wednesday, November 30, 2011

Christmas Trimming from Heartfelt Creations


This is my newest project that was made for Heartfelt Creations.  It features the Petite Poinsettia and Poinsettia Ornament PreCut Stamps and Petite Poinsettia Shapabilities and Heirloom Ornaments 2011 Die Cuts.   Make sure to check out all the other design team members beautiful projects featured on Heartfelt Creations Blog.  They are more detailed pictures as well as instructions on how to create your own. 


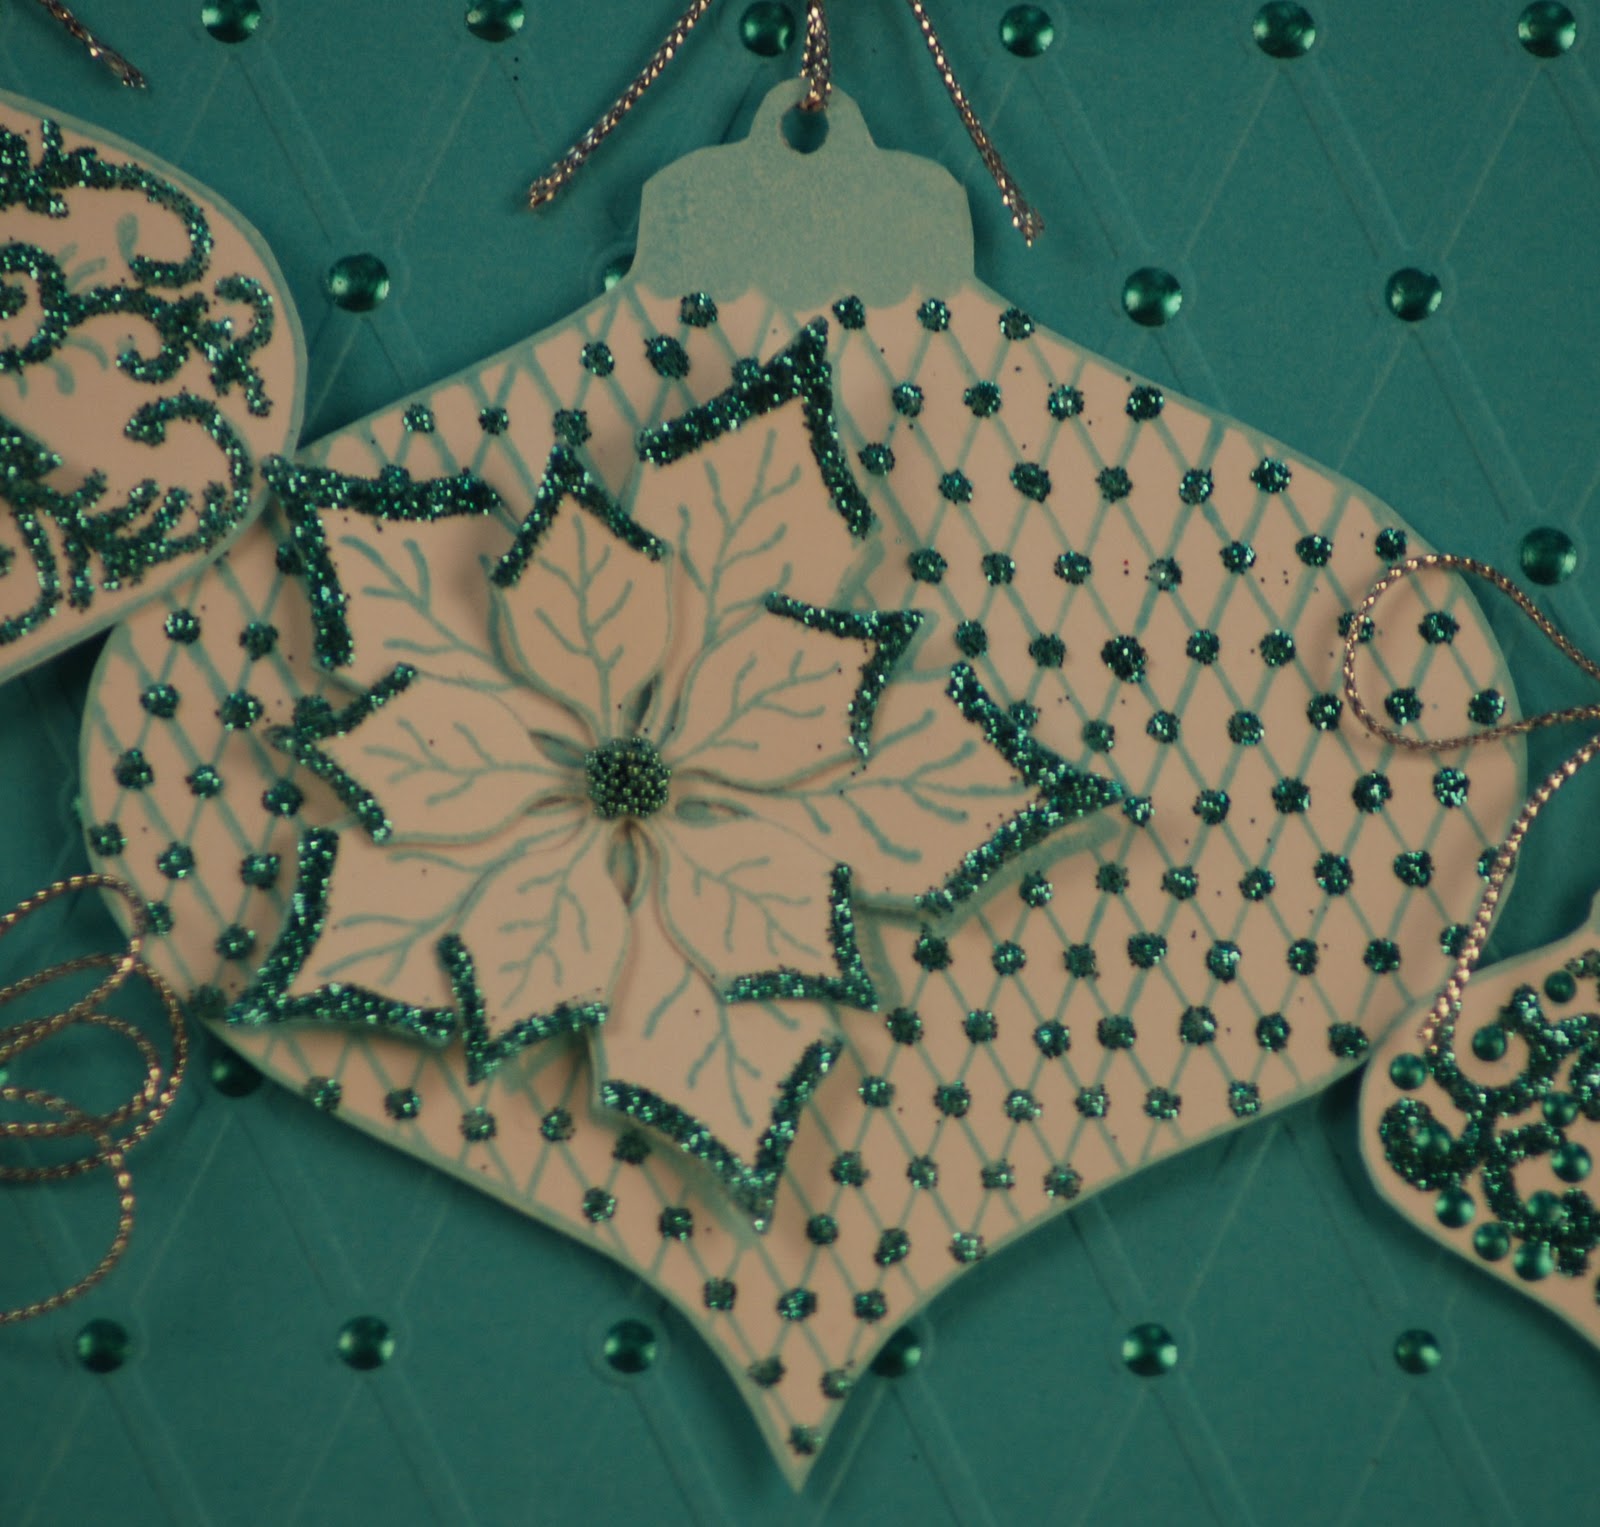
Detail view of the glitter scrolls and Liquid Pearls
How it was Made:

Other:  Quickutz embossing folder (Diamond and Dots), white card stock, teal card stock, aqua card stock, Peacock Liquid Pearls, Versa Magic Ink Sea Breeze, silver cording, Big Shot, Quickie Glue Pen, Stamp and Bond, Teal Glitter, Heat Gun, Zots, Pop Dots, Teal Micro Beads

Cut white card stock at 8” x 10¾”.  Score at 5⅜” to form card base.  Cut teal card stock at 7⅞x 5¼”.  Cut aqua card stock at 7 ¼”x 5”.  Run the aqua card stock through Big Shot with Diamonds and Dots embossing folder twice.  Make sure that you line up the design carefully so that the image will look good on the card stock.  Add Peacock Liquid Pearls to the dots of the embossed mat.   Let it dry and adhere to the teal card stock.  On white card stock stamp 2nd largest ornament image and the two smallest ornaments using the Sea Breeze ink.  On white card stock stamp (1) of the smallest poinsettia, (2) of the 2nd smallest poinsettia and (1) of the 3rd largest poinsettia all in Sea Breeze ink.  Using the Big Shot and Layered Poinsettia and Heirloom Ornament dies, cut the stamped images out.  Using the Quickie Glue pen apply adhesive to the details of the stamped images, such as the edges of the poinsettia and scrolls of the ornaments and the dots of intersections on poinsettia.  Then add Stamp and Bond and then heat set and apply glitter.  Assemble all ornaments and poinsettias.  Layer largest poinsettia on largest ornament then add the next largest poinsettia on the top of that.  Using the Art Glitter glue add micro beads to the center to the flower.  Layer the remaining poinsettia to the ornament and then add the micro beads to the center of that flower.  On the smallest ornament add Peacock Liquid Pearls to the end of the glitter detail.  Punch holes at the top of all the ornaments and add silver cording to all the ornaments.  Add the ornaments to teal/aqua mats by wrapping cording around the back of the mats and then attach to the mat fronts with pop to give dimension.  Add the matted ornaments to the card base.  Add silver bows made from the cording to the ornaments using Zots.  Add a larger bow to the card front at the bottom left.  

Thanks for Stopping by.  Please let us know what you think.
Until Next Time......


Sunday, November 27, 2011

 
This is this week's submission for A Crafting Start blog.  The topic this week is ink.  This card actually features emboss resist .  It was stamped with VersaMark and then I used clear embossing powder.  I then added Summer Sky ink from Memento and applied with sponge to reveal the stamped image.  I love how it turned out.

Thanks for stopping by and please let me know what you think.  


Until next time.

Saturday, November 26, 2011

Thanksgiving Blessings - A Crafting Start

 
This my design team submission for this week over at A Crafting Start.  Make sure you stop by there blog and check out all the talented design team members creations for the week.  This week the topic is Punches.  This is the card that I designed using my circle punch.  I loved the way the pumpkin turned out and this card was so beyond easy.  And if you look down later in this post you will find the instructions for how I made it.  
A detail view of the pumpkin.


Products Used: 
·         White Card Stock
·         Orange Card Stock
·         Green Card Stock
·         1½” Circle Punch
·         Memento Ink Pad Tangelo
·         Thanksgiving Blessing Stamp
·         ⅛” wide Organza Ribbon
·         Bow Easy
·         Darice Embossing Folders Autumn Words
·         Zots
·         Pop Dots
·         Big Shot

How I made it:
·         I cut the white card stock at 6”x 9¼”.
·         I scored the white card stock at 4⅝” to form card base.
·         Punch 3 circles with 1½” punch out of orange card stock.
·         Edge the 3 circles with Tangelo ink pad.
·         Layers circles together to form a pumpkin, use a pop dot to attach the top circle to give your pumpkin more dimension.
·         Cut a stem shape out of a piece of green card stock.  Attach to the back of the pumpkin. 
·         Stamp Thanksgiving sentiment on white card stock with Tangelo ink.  Cut the white card stock at 1¼”x 1¾”. 
·         Cut a piece of orange card stock at 1½”x 2” and attach Thanksgiving sentiment.
·         Cut a piece of white card stock at 2”x 2½” and attach pumpkin.
·         Cut green card stock at 5½”x 4¼” and then use the fall words embossing folder and a Big Shot and emboss mat. 
·         Add Ribbon to the embossed mat and then attach to card front.
·         Make a small bow with the ⅛” wide organza ribbon and the Bow Easy, attach with a Zot. 
·         Attach matted pumpkin to the left center and sentiment to the bottom right of card front.


Thanks for stopping by.  Please let me know what you think.  Until next time.

Friday, November 25, 2011

Heartfelt Creations presents "The Artistic Gatefold Collection"


My newest creation featuring Artistic Gatefold Collection from Heartfelt Creations.


Heartfelt Creations is pleased to present the Artistic Gatefold Collection . This collection, in simple terms is "stunning and genius". It features  6 new precut stamp sets that coordinate with existing Spellbinders dies and 2 new exclusive dies. This is another must have collection.

Don’t feel guilty for splurging on yourself!
Heartfelt Creations will be donating 10% of all Black Friday sales towards ChildCry, a non-profit feeding organization founded by Times Square Church. ChildCry feeds over 4159 kids in 22 different countries, including the United States. Every penny donated to ChildCry is used to buy food for hungry children so go ahead...feed your hobby, and a hungry child! You can view all the details by following this link: www.childcrynyc.org.

Leave a comment on the Heartfelt Creations blog by November 29 for a chance to win the entire release valued at $150. The winner will be announced on the HC blog on November 30.

Here is the instructions for how it was created:
Other:  White Card Stock, Black Card Stock, Maroon Card Stock, Green Card Stock, Vellum, Memento Ink Pad Tuxedo Black, Tim Holtz Distress Ink Vintage Photo, Gold Door Knob, Sponge, Red Satin Ribbon, Pine Branch Punch, Green Flower Soft, Martha Stewart Tinsel Glitter, Zots, Pop Dots, Big Shot, Bow Easy, Stamp-A-Ma-Jig
Cut a piece of white card stock at 8”x 10¾”.  Score the card stock at 5 3/8” to form the card base.  On white card stock, stamp four panel door image 4 times in Tuxedo Black ink.  Cut the door image out completely for one door.  Cut out 4 panels of another door.  Mask part of the last 2 door panels and line up stamp and stamp image again to add detail to what will be the side panels of the door. Cut the pieces out for the 2 side panels.  Apply Vintage Photo ink to all door parts with a sponge.  While all the door parts are drying, cut out 4 pieces of vellum at 1”x 1½” to make windows in side panels.  Cut a piece of black card stock at 3”x 4”.  Place the smallest arch from HCD 717 to the top of the black card stock and run it through the big shot.  Trim down card stock to fit the arch design at the top.  Cut the smallest swirl design from HCD 717 out of white card stock.   Apply vintage photo ink to the design.  Attach to black card stock arch.  Assemble door pieces.  Add the vellum to the side panels and add pop dots to side panels for dimension.  Add the 4 extra rectangle pieces to front door panel with pop dots again to add dimension.  Add the gold door handle to front door, and attach front door to black card stock arch.  Add pop dots to the door panel and set aside all door parts until you are ready to assemble card front.   Using the green card stock cut out 2 small scalloped circles.  I cut the bottom off to make them flat and applied glue to the entire surface and then added green flower soft and tinsel glitter to form bushes.  I added pop dots to them and set aside to assemble.  I punched 3 pine branches out of green card stock and then assembled using zots and then added a small red bow that was made with the bow easy.  I added a little of red bling to the greenery swag and then add it to the front door.  I stamped the one edge of the wood frame on maroon card stock with Tuxedo Black ink repeatedly and then I cut the strips out and applied glue and layered them on a piece of 7⅞”x 5¼” piece of maroon card stock to make it look like siding.  I added the maroon card stock to the card front.  I then assembled the door parts on the card front.  I added the bushes, one on each side of the doors.  

Thanks for stopping by and make sure that you check out all the amazing creations at Heartfelt Creations.  Until next time.....


Sunday, November 20, 2011

Let's Build a Snowman-Paper Temptress


This is my newest submission for Paper Temptress.  It features the Red Pepper Skinny Columns Card Stock and Cryogen White Copic Coloring Card Stock from Paper Temptress. 

Detail view of stamped image.
 Thank you for stopping by and please let me know what you think. 

Saturday, November 19, 2011

May Your Christmas Sparkle--Heartfelt Creations

This is my newest creation for Heartfelt Creations.  I love any opportunity to add a little glitz to a project.  Be sure to stop by Heartfelt Creations blog and check out all the new project samples from the very talented design team.  Look below for details on how this card was created.


Detail View of Poinsettia


Other:  Memento Ink Pad Tuxedo Black, Versamark Ink Pad, Ivory Card Stock, Red Card Stock, Stamp and Bond, Glitter: Red, Crystal, Green, Green Gemstone, Big Shot, Heat Tool, Bow Easy, ⅛” wide Organza Ribbon, Quickie Glue Pen, Zots, Pop Dots, Copic Markers: YR68, Y35, G28, E50, R29

Cut ivory card stock at 8”x 10¾”, score at 5⅜” to form card base.  Cut red card stock at 7⅞” x 5¼”.  Stamp the two smallest poinsettias on the red card stock with the Versamark stamp pad randomly.  Add Stamp and Bond to the stamped images and heat set and then add red glitter.  Make a bow with the ⅛” wide organza ribbon.  I used the bow easy to make the bow.  Then add the bow to the stamped and glittered mat and then add to card base.  Stamp the candle image on ivory card stock with Tuxedo Black ink.  I also stamped the Merry Christmas sentiment in black ink under the candle image.  I colored the candle image with Copic markers.  I add details to the colored image with the Quickie Glue pen and glitter.  I used Crystal glitter on the top of the candle and the green glitter to the holly leaves.   Then using the largest die from Labels 8 cut out stamped and colored image and added it to the card front.  Using a scrap piece of red card stock I stamped four of the smallest poinsettia and two of the largest poinsettia with the Versamark ink pad.  I added Stamp and Bond to the stamped images and then heat set and then added red glitter.  I then cut out the poinsettia with the Spellbinders dies.  Layer the poinsettia together using Zots.  I added them to the poinsettia image on the card front with Pop Dots.  I added a small green rhinestone to the center of the larger poinsettia.

Tuesday, November 8, 2011

Newest Creation for a Crafting Start


This is my newest creation for A Crafting Start.  The project for this week was Stickles.  I love any opportunity to add glitz to any project.  So since the whether is turning colder and all the leaves are coming down, my thoughts turn to Christmas.   I know it is only early November but I am ready to start my Christmas decorating and shopping.  Thanks for stopping by and please let me know what you think.  Make sure you stop by A Crafting Start and check out the talented Design Team members and all there creations.

 A detail view of the Stickled trees.  I love the dimension that the Stickles gives the stamped image.


Monday, November 7, 2011

Sorry it is a Little Late!


I guess it is better late than never.  This are a little treat bag that I did for my daughter's dance studio.  She is a teacher's helper for the younger dancers.  She love working with the little kids.  So I decided (I think it was Todd's idea) to make them for the trick or treaters.  Since we just moved into our new house and thought it would be a nice way to introduce our self to our new neighbors.  I asked around and was told that we get around 20-30 kids so I thought I was safe making 40.  We ended up with 75 kids.  So I used what we had and I lucky we had extra candy and then we used some of the treat bags I made our daughter and replaced them the next day.  So I ended up making 82 of them.
Thanks for stopping by....Let us know what you think.

Sunday, November 6, 2011

At the Water's Edge


Good Evening.  I just wanted to share a quick post tonight.  This is a card that I made for my Papa's birthday.  I really have a problem when it comes to creating a card for a male.  I not sure why, but he is pretty easy to come up with something.  He spends his free time on his sailboat.  So when I found this stamp and knew I could put it too good use.  So I pulled out my stamp from Heartfelt Creations and my Copic Markers and created something special for him.   
It is hard to see in the picture, I stamped a second image and colored and trimmed out the rocks and put it up on pop dots to add dimension to the card.  Thanks for stopping by and let me know what you think.  Till next time.


Thursday, November 3, 2011

Floral Ornaments

Heartfelt Creations  Products: 
HCPC 2291 Regal Poinsettia 2 Precut Set, and Spellbinders Blossom 2.

Other products: Versamark Watermark Ink Pad, Stamp and Bond, Red Cardstock, Silver Glitter, Red Glitter, Glass Ornament , Big Shot, Heat Tool, Pledge Floor Wax, Silver Stickles, red and silver micro bead glitter, and ⅛” wide organza ribbon.


How to make the ornaments:  Stamp the 2nd, 3rd, and 4th size Regal Poinsettia stamp on the red card stock with the Versamark stamp pad.  Apply Stamp and Bond to the stamped image.  Heat set the Stamp and Bond and then add glitter to image while still warm.  Cut out stamped image with the Spellbinders Blossom 2 die cuts.  Cut the center of each of the flowers to fit over the neck of the ornament.  Layer flowers and apply to the glass ornament.  Replace ornament hanger add ribbon for hanging and stickle around the top of the flower.   The poinsettia with the red glitter has red and silver micro bead glitter.  The poinsettia with the silver glitter has silver glitter applied to the entire inside with floor wax.